Showing posts with label machine sewing. Show all posts

Tuesday, July 10, 2018

Swoops Skirt

Made with a lovely crisp greenish linen, the hem is stiffened by the 6 rows of hemming!


Monday, May 28, 2018

Geometric Skirt

A hi-lo skirt made from a peachskin fabric. Very light and drapy.

The hem is decorated with a stepped stitch.

Monday, June 17, 2013

Sewing Machine Review: JS110 SE


I've had my machine for a year and a half now and I quite love it despite it being a partially plastic department store branded modern machine that so many disdain. With the exception of a few “I bought it for my niece” reviews, there's not much online about it.

First, I'd like to establish my sewing machine credentials. As an undergraduate I gained a lot of experience on three machines. One was a computerized Brother (something similar to the BC2100) which I ended up pretty much hating what with its crazy computer faults, bad automatic tension and its general inability to handle medium weight fabric not to mention anything automatic. One was a fairly modern slightly above beginner level Singer which was alright but I found had tension problems in the bobbin which no tune up could fix. The final one was a fairly modern Janome which was my favorite and the one I ended up using most of the time. While I was lusting after a sewing machine of my own and using the faker, I took a special trip to Rotherham to spend a day at Lennox Sewing & Knitting Machines shop where I learned a bit more about machines.

Brand and Model:
So my machine, Audrey, is a JS110(SE) from John Lewis. The special edition refers to the color (solid purple).

I ended up getting it more through restrictions and price rather than research but since then have given a good amount of research. Quite frankly, it's remarkably close to Janome's USA-only 2212 in look and capability.

How much did it cost? £99 is the list price, mine ended up being £70 because of sales. (They switched to a color blocked one a few months after I bought mine.)

What do I sew? In general I mostly sew clothing.

How much do I sew? Practically everyday. I've sewn over 10 triple circle skirts on this baby. 

Fabrics:
I sew a lot of knits of all weights. I also sew a lot of clothing weight and quilting cotton. It has failed to snag on lace fabrics. It sort of swallowed some of the felt and chiffon but quickly recovered when I started a bit further in. The home dec fabrics that I make my tote bags out of have also gone through this machine without much of a problem. The corduroy and thicker suiting fabrics have also not really given it a problem. 

The only fabric it's ever really had a problem with is this awful completely synthetic slippery stuff that really was so horrible to cut that I wasn't terribly surprised no stitch would stay on it.

User Error
Every time it has given me problems was completely user-error. Like with most machines you have to thread it correctly every time. The three times I've been genuinely worried I'd broken it, it was just late and I'd threaded it wrong.

Stitches:
I use primarily the straight stitch and zig zag stitch. I've had no problems with needle positioning and twin needle use. I like the buttonhole-I practiced it a lot before using it on a garment and find it nice and easy though it's tricky if you have particularly thick buttons and need a wider buttonhole. I've used the tricot/three step zig zag on knits without a problem. The blind hem stitch takes a bit of practice but also works well when needed. The applique stitch is close and tight.

Bobbin:
The machine recommends plastic bobbins but takes metal ones too. Elastic thread for shirring runs through just fine.

Other Advertised Functions:
Obviously, you can make it into a free arm for sleeves. And the free arm has a little storage compartment for your extra feet. The drop feed is a little plastic plate that you snap above the feed dogs and it stays in place.

The Good: (that they don't really tell you about)
A. Snap foot. I love snap foots because they make switching feet a cinch.
B. Bobbin tension is good and steady. Top stitch tension is easy to control and tweak. I've managed to troubleshoot all tension problems with just top tension tweaking.
C. Handles knits pretty well. I've sewn with machines that hate knits and whine & tug more than they should. This is not one of them. Also didn't swallow my felt or thin fabric.
D. Reverse button is well positioned. You're not going to accidentally press it.
E. Though John Lewis doesn't sell any branded accessories, it works with the general snap feet and general needles. This does not lock you into branded accessories.
F. Easy to maintain. You can easily reach the feed dogs to clean out the fuzz. It's simple to reach the moving parts for oiling. I've not needed to replace the bulb but I checked that it's simple to unscrew.
G. The warranty does include tune ups. I sent it in out of paranoia because the warranty was about to end telling them something vague like “oh, it was sounding a bit...odd”. They tuned up the tension dial, cleared dust out of the engine, and gave me some oil.

Things to Consider:
A. This is not a machine that sews at 120mph like some machines. Foot to the floor on the pedal at 2 stitch length this machine takes a few minutes for every foot of sewing. This is a relatively slow machine which suits my style just fine since it forces me to actually think about what I'm doing (I used to sew at 120mph and spent a lot more quality time with my unpicker). You don't need a max speed limiter.
B. Stitch length gets a bit vague. It's difficult to get a good machine basting stitch (I baste by hand). Similar problem is regulating the zig zag width. Nice and vague so you need to test it out if you have specific width needs. Buttonholes can also get a bit difficult if your button is not the average width.
C. Stretch stitch has tension problems and often snaps. Really annoying because it means you're often going to have to do some troubleshooting. This works fine for me because I've familiarity with what to do but I can imagine that beginners would have no idea what is going on.

Some Nitpicks:
A. Requires long threads at beginning. Maybe it's because I often get down to the very last 3 inches of thread and hate having to buy a new spool of thread for the last seam but I get a bit frustrated that the machine seems to want such a long tail. If it's even the slightest bit too short, it pulls out of the needle. I'm not entirely sure if this is a general oscillating hook problem though.
B. You need to keep an eye on it while winding the bobbin as the motion can pull the spool of thread right off its spool and catapult it across the room.
C. If you're planning on carrying this machine on the bus, keep in mind the free arm will fall off the instant the bus hits a pothole. Simple solution is to take it off preemptively and put it in your bag of course.

The conclusion:
This is a beginner's entry-level machine and so has all the basic capabilities. If you're relying on one step buttonholes and crazy stitch options and mechanized convenience, this is obviously not the machine for you. However, it is an excellent beginner's machine as it relatively behaves itself and is surprisingly tough. I use mine much more than its description described and it gives me little problem.

I should also mention that I'm the sort who reads the manual which has probably saved me a lot of grief. It's only 27 pgs of a lot of white space so it's no chore in this case.


If I were to buy a new machine, I'd probably go one step above. I'd like a variety of buttonhole styles and the ability to be more specific about my stitch widths and the like. However, I'll happily use this machine until it fully dies as my complaints are minor and are mainly of convenience rather than function.

Monday, June 10, 2013

Countryside? Fabric

I made a trip down to London and then thought the fateful words: maybe I'll just pop out to Walthamstow Market to see if there're any cool deals and/or blue flowery paisley suiting (don't ask).

Of course I ended up with over 30m of fabric and loads more of ribbon/trim, etc.

Among them was this mystery fabric.

It is exceptionally soft and burn tests show it has some organic fibres in it. And it's cute, it has horses, hares, and stags...and some random blotches of what-is-that. It's probably meant for small children with its...woodland? countryside? theme and the soft lilac background on which the purple animals repeat in a small scale random pattern. It frays easily, drapes lightly, and gives a little.

So! What to do?

First up was a box blouse. I made it for St. Patrick's Day to go with my green trousers.
All the hems and neckline are narrow rolled hems. I added little side slits to make the box blouse shape fit my figure without too much fabric overuse. Soft and comfortable.

The fabric got re-rolled and put back on the shelf. Until I had sewn two more knit triple skirts for my rapper team. And I thought to myself, I should definitely do a woven circle skirt!
 If I do say so, it looks good.
the Successes: I successfully installed my third zipper ever. That's piping going on below the waistband-my first successful piping attempt (I need smaller cord is what I learned). I got the buttonhole right the first time and that rolled hem worked a treat.

the failure (and some optimism): Of course, I should've thought to check my math. The problem with circle skirts is always the math. I forgot that my current working formula was for knit fabric which allows for a huge bias stretch. Yes, bias stretch this fabric completely lacks. Eurgh! This ended up 4 inches too narrow with the waistband being exactly my waist width. I had to add a panel on the side to make up the extra width. Not a problem for non sewers who all have told me it looks so lovely but an annoyance. Luckily the pattern is random so that's not an obvious flaw and the panel is exactly the width of my side. The skirt looks unseamed from the front and from the back and the panel hangs exactly the same way as the rest. So I've kept it.

some more failure: This last minute panel used up much of my last bits of fabric but I still had some largish pieces. So like with the zig zag fabric, I decided undies were the order of the day. So I tried out the Amerson undies. There's no photo because I ended up making a pair that was joined at the wrong point. *headdesk* Seems like many who got the first version of pattern did the same. Then I finally got them right and I tried them on to find out...they didn't fit me. The style didn't suit me either. But don't let me scare you off, it's a free pattern, forces you to learn some new techniques, and has other people who love them.
Mine ended up pulled apart and harvested for the elastic back.

A success: So now I had some former undie pieces and random rectangular pieces. The fabric frays too much and is surprisingly weak so it wouldn't work as handkerchiefs. But then I was reminded again about tea cup pin cushions.


I bought some epoxy glue and grabbed one of my mismatched and very very sturdy stoneware hunting tea cups. I packed in some strange scraps to fill up the cup. I topped it off with fiberfill and glued the woodland fabric as taut as possible to make the pin cushion. I then glued cup to saucer. And you know, I love it. No longer does my pin cushion roll away from me, M hasn't stepped on it driving pins into his foot, and it works as a pattern weight. I was worried it'd take up space on my cramped work desk but the saucer works a useful little catch plate for the little things (like earrings) that otherwise get lost. When I'm sewing, my embroidery scissors, seam unpick, and a hand needle usually end up hanging out on there too, in close reach. Invaluable addition to my sewing life!

Another success: With some of the last little pieces, I whipped up some hair bowties. Made in the same way as the zig zag ones except that this fabric frayed too much so I used some of the last bit of bias binding I used for the piping of the skirt. Two stashes whittled down? Oh yeah!

Monday, June 3, 2013

Zig Zags!

My current thing is to take a piece of fabric and use as much as I can of it before resigning it to scraps.

First off is this 2 yards of knit red zigzag fabric:

It's a delightful knit that is well printed in straight lines. It pills a little and is slightly see through but it is a dream to sew with if a bit dizzying to try to match up stripes.

Success: I bought the fabric with a straight pencil skirt in mind. With my hips and posterior I really prefer my pencil skirts to be made out of knits because otherwise it gets uncomfortable/rides up real fast. You've seen it already as part of Me-Made but here it is again.


Construction is simple. Two rectangles sewn together (and I did quite well at stripe and peak matching. one side is perfect...the other is close) with a waistband made of a rectangle folded over the elastic. Twin needle hem makes this a figure hugging but not tight skirt.

the failure that turned into a success: My second project was born of seeing that fabric on my floor (where I do all my cutting out). I laid down and confirmed that indeed, I should be able to create a long enough dress out of what was left.

I drew up a croquis:
and made a bodice with shirring elastic in the center to ruche the center and then decided that midriff and skirt could be one piece. That was my fatal error.
Here's the skirt cut out and sewn together:
see the potential problem? (other than that I really need to tidy up)
too slim cut through the hips! Oh no! I'd just made it way too tight for me. Plus ALL those zigzags was doing something to my eyes-something quite unpleasant. Why, I thought to myself, didn't I do the method of cutting a rectangle and sewing the sides afterwards instead of cutting for the sewing line.

I lost heart and decided to stitch the top down to turn the fabric inside out as a contrast but not too constrasty midriff section. I then realized that since I sewed for the entire rapper team I have quite a good idea of their shapes/sizes and that this would fit another girl quite well. Oh good, this wouldn't just be a WIP tossed in the corner of my room. She was delighted to get a free dress and was game for a quick fitting. I determined that it was tight on her but did not show every bulge and unseemly fold like on me and redefined the dress in my mind as hers NOT mine. I proceeded to shorten the bodice, shirr the top of the bodice and then bind it with bias binding. I got out the twin needles again to hem it to length. I looked at my scraps and realized that if I put the zig zag vertical I could use up a particular scrap and so it went. I of course looked at my interfacing stash and went WHERE DID IT GO?! and ended up using the stay tape that I won from StephC (which makes it the third time it saved me some hair pulling and lost project momentum) to make them stronger/less stretchy.


For some reason it looks relatively shapeless and baggy on a hanger. But here it is on her!


Still a bit too slim cut but the fabric isn't working hard as when it goes on me (i.e. the zigzags don't straighten out on her).

Some real success! So after that sadness and debacle with a happy ending, I had some largish pieces left. I had already decommissioned a favorite pair of undies to cut up for pattern making but it had languished in my "things I could easily get on with but don't pile". Once I cut them up and traced them I made up my first pair of undies using the flat construction method (sew crotch together, attach leg elastic, sew one side seam, attach waist elastic, and finish off). They were a bit tight but definitely wearable but as I had just enough more fabric if I did some piecing I determined I could do with an extra cm all around and now those are the most comfortable undies I own.


What's left? Strips of fabric too narrow to make much out of but not long enough to wrap around the head, rectangles of odd sizes etc. Some of the irregular scraps got hemmed to be handkerchiefs but that's so routine for me by now that I barely noticed the decrease in scraps amount.
Success: So hair bowties it is! I've been wanting to do more of the hair decoration route of hairdressing so banging up a few mini bowties was in the books. 


The fabric gets interfaced (I had gone out and bought some by this point) and sewn into a rectangle inside out. It gets turned right side out, that little gap stitched up and ironed flat. Then you pinch it in the middle and stitch it pinched. I used some more stay tape against a small strip I fished out of my trash, wrapped it around the pinch and stitched it relatively higher on the back so that the rest of the strip could be used to bobby pin it in.

As for the rest, I'm out of inspiration. Quilt? Does knit even work for a quilt?

Sunday, June 2, 2013

Me-Made May '13 Final Week

Sunday
This skirt was originally a dress. A very unflattering dress. A bit of regathering easily made it into a skirt. I replaced the original navy blue underlining that rode up at any excuse with a bright blue static free lining. 

not me made is the top I grabbed from a charity shop

 
Monday
This skirt used to be my favorite skirt but a few years ago, I realized that I had to tug it down a lot and the fabric was ripping at the gathers. So this went on my mending pile to have the rips repaired and hand sewn arrowheads at every possible stress point. There are probably 14 of those arrowheads that get lost in the floral print. Now that I'm much more aware of fitting problems and solutions, I know that this is too long in the torso for my figure and will never work for me.

The tights have stars on them. I put them there.
 
The bag is a remake of the old version. I got the bag from a dig but it was thin cotton. No match for my bookish lifestyle or tendency to carry sharp things. Once it developed holes I could no longer ignore, it was time to remake the bag. The base bag was created out of drill, I added an interior pocket to hold the smaller things that might get lost in a totebag, and flatter straps that won't dig into my shoulder so badly. The original bag had its tears repaired and then the design half got appliqued to the drill bag base to create a much stronger version of itself.

not me made is the H&M top and Marks&Spencer shoes

 
Tuesday
A couple of months ago, the constellation scarf was making the rounds of pinterest. This is mine. I accidentally stained this scarf with red blotches so I decided it was perfect for refashioning with a row of red constellations embroidered along the blotched edge. Now it seems a little more intentionally reddish...or so I tell myself.

This was a fairly early skirt. Elastic waist and tiered design with the dots getting bigger to the hem. Not much to say there but I love it. The very deep hem makes it swing delightfully.

not me made are the Camper mismatched mary janes and H&M top

Wednesday
My first box blouse and it's made out of non-drapey almost quilting cotton so not the most comfortable. But I love the print and the little standing collar edged with lace-it's pretty much me.

not me made are the oddly sized jeans

 
Thursday
The skirt was made on the faker out of buttery soft mystery fabric. The ribbon was to hide the horrible seaming caused by the faker. It's due for a reworking. Maybe the fabric could lie flatter if it were sewn with a machine that had tension. 

not me made are the Menkes heels and H&M top

Friday
Perhaps an overkill of polka dots. This was my first attempt at a woven circle skirt. Trimmed in ribbon and two types of lace, this was a rushed work of love. Does that make sense? Also due for a reworking.

The bag was made by me out of Ikea fabric. I wanted a tote bag for my books. I carry a lot of library books to and fro and it made sense to make a bag that could hold 8 averagely sized books. It's a simple tote bag but the perfect dimensions for my average library loot haul. I like how it displays the large scale print.

not me made is the slip I grabbed from a charity shop that may have been intended as a skirt. As the fullness is like a petticoat and the fabric is nice and thin, I use it as a slip.

 
Bonus Saturday
I didn't realize it was June! So here is a bonus. I got this dress online and on the advice of reviewers went a size up...which ended up a size too big. Obviously, the reviewers were not sewers who know their measurements by heart. Instead of paying the same amount to send it back, I took in almost every seam and tapered the sides to fit my curves. I couldn't figure out how to remove the collar but honestly, even had I not made some changes to the shoulders, it would've gotten modified anyway. The white fabric is too thick and sticks out awkwardly (at the kickpleat and collar) so the kickpleat had to get sewed together (making this a wiggle skirt, going up stairs at an angle and all) and the collar got pleated. I rather like the collar more than the original vision.

not me made is the hat.

Well, I'm proud of myself. This was my first me-made-may and not only did I manage to make sure I had a lot of pictures, I even forced myself to get dressed every day despite lingering unemployment and bad weather.

Some Things I've Learned:
-I ended up hating some clothes after spending a day in them. Some of these items are leaving my wardrobe.

-My revisit/remake pile is very large. Le sigh.

-I look rumpled something like 95% of the time. If it isn't pull lines, it's wrinkles or whatever. I pretty much always look like I slept in my clothes. Nothing lies flat against my body which makes sense but also...makes me look rumpled.

-I need to remember to wear shoes for pictures. While we're on that subject, maybe I should practice non-weird expressions for self-portraits. I either look sad, weirdly tired, or just...yeah. I think I look way weirder in photos than in real life. Or at least I hope I do.


Monday, May 20, 2013

Felt Cases

I'm hard on my electronics. They all take dings and glue marks (part of the reason I do non-adhesive books is that I cannot use glue without getting it on everything) and get transported here and there. Instead of buying cases from the shop (or modifying one in the case of my graphics tablet) I looked at those pieces of thick dressmaker's felt in my stash and said to myself-yep, I'm gonna make them. De-stash bonus!

And since I made these before I had embroidered the rapper sashes, I fancy it's easy to see the progression of my nonexistant embroidery skills from my first attempt which is really just a book binding stitch to my bad-tensioned second attempt to crisp SSR. I love recognizing progression of skill mainly because I feel like I tend to hit plateaus and terraces in most things.

First off, my phone case:

So my phone already has one of those bouncy rubber cases so it's protected against the inevitable drops it takes but once it gets in my bag, that screen protector gets smeary and surface scratched (no idea how!) so I made this simple envelope style case. Inside it's lined with this odd water repellent fabric (shop closings-always end up with strange fabric from those things) that allows the phone to slide in despite the skid-proof rubber case. (I also like to think it'd repel water if I, say, drop it in a puddle.) The zig zag stitch you see is anchoring this lining-it was so slippery during sewing I sewed it down in frustration. Since neither fabric frays, the sides could be stitched and trimmed without edge finishing so my laziness does mean that there is a hint of the pinstriped lining fabric at the edges. It doesn't bother me one bit. The flap is pinked for decoration and held down with 2 snaps.

Of course, I couldn't leave it alone and decided to embroider it. Do I own an embroidery hoop or have any real previous experience with embroidery? Of course not. Did I let it stop me? Nah. So there is my personal logo outlined with blue (to match the lining fabric) in a backstitch filled with what my embroidery booklet calls a "seed" stitch in green. Is there puckering? Only minorly and it absolutely doesn't interfere with the case doing what it's supposed to-protect my screen from the ravages of my bag.

Next my graphics tablet:

I actually made this first but the construction was a bit more complicated. I constructed that outer pocket and stitched it down the sides to the outer layer of felt. Then I embroidered that T using a book binding cording stitch. (which makes it very nubbly) Then I stitched outer layer of felt to an inner layer which is why nothing ended up straight. Whoops, oh well. Those layers of felt don't fray so they got stitched into a simple envelope shape. Flaps pinked and buttons stitched on-mother of pearl for the cord pocket and bunnies for the main flap. The buttons are slightly too large but I actually don't have any smaller in my stash so whatever. They do their job with a tightly knotted trail of embroidery thread that gets threaded around them alá those interdepartmental envelopes.

Monday, May 6, 2013

3/4 Circle Skirt

So before I could be sure I'd be able to make at least 6 triple circle skirts with bright orange waistbands, I needed to be sure that I could do waistbands. Serendipitously, my local fabric shop brought in this range of gorgeous colors of knit fabric so I could give into my WANT of those beautiful colors of knit. This was before Christmas so my best friend got a 3/4 circle skirt out of a turquoise that I thought would be perfect with her eyes and job (yep! yep!). Her partner got a green skirt of her favorite design (a knock off of a major chain's skirt) that I thought would fit perfectly into her wardrobe's palette (yep! yep!).

For myself, I made a 3/4 circle skirt out of purple. A perfect casual skirt for me that looks fine with tshirts.
I use this excel worksheet I made a long time ago to calculate the radius of the waist circle and the radius of that plus the skirt to the hemline circle. I then use my measuring tape like a compass marking the semi-circle with pins that I then cut along. If I fold it correctly, there're no seams-this skirt has one seam. The waistband is a simple rectangle folded over the elastic, edges tucked in, and finished with a zig zag. Then it gets sewn onto the skirt right sides touching and given a minor press to lie flatter around the wait to reduce bulk. The result is a skirt that falls like it has gathers but actually doesn't have any.

Sunday, May 5, 2013

Me-Made May '13 Week 1!

So it's Sunday! And I've been eagerly reading everyone's posts about their me-made outfits and I'm happy I'm not the only one who has loads of things in their closet that have not been blogged. I even have the excuse that I've only just started blogging my dressmaking attempts....

Anyhow! So you'll recall that my Me-Made-May pledge used both retailor and refashion in it. I used both in a conscious effort to include the garments in my closet that only needed small little adjustments to make them more wearable. These adjustments can mean something like a reshaping of a side seam or a dye bath. I very much treat my clothing in a make-do-and-mend fashion and a lot of my clothes are almost a decade old!

Day 1
The dress is vintage, probably early 1970s because of that elasticated waist and the brand tag is the "just moved to Germany" style. I was looking for a neutral casual dress that would be light and airy but robust enough for picnics and such. This fit the bill with its shirtwaist style, high comfort level (there's a back vent!), and pocket with its pocketkerchief, but there was so.much.fabric. in the bodice. It bloused out and made me look about 10 pounds heavier while simultaneously the buttons popped open ready to showcase my bust at any quick moves. So! I took in fabric into the raglan sleeves while simultaneously easing out some fabric for my bust. With some snappers in between the shirtwaist, it stays shut-pulls but stays shut. The side seams got remolded to counteract the blousy effect of the elastic gathering and here it is!

The belt is my favorite ribbon belt. Look for it again and again as it's the most versatile of my DIY efforts.

The not seen slip is not a successful slip. It's going on my remake pile. It pulls across my hips hindering my movements which is silly considering the volume of that skirt. The waist falls down whenever I bend over. I will see if some shirring will fix it but likely, it'll get torn apart and made anew.

May 2nd
Look at the sun! It's warm enough to not need a cardigan! Second day like this all year!

The skirt is the first appearance of this blog of this zig zag knit and it certainly won't be the last. I usually hate pencil skirts, mainly because RTW woven ones make me look like: "oh the '50s called, they want their birthing hips back!" and then when I turn around the only adjective that comes to mind is "bootylicious". Not that these are necessarily bad things but people have talked to my crotch. Never not awkward. Not this one though, this one instead has inspired loads of people to ask if I've lost weight (nope) and to tell me I looked sleek. I guess it's because the waistband nips into my waist comfortably but the fabric is not working hard around my hips/posterior. The zig zags also probably make the eye wander down to my legs instead of letting them stall at crotch level.

Not me-made: the shirt is a faithful 7 year old band tshirt I got at a Gogol Bordello show. The shoes were bought in Cyprus and I'm looking for an affordable replacement. 

May 3rd
Mountain weather means that when I set up my bookstack it was sunny, it was cloudy when I took this tired looking picture and sunny again when I sat back down at the computer. I love you mountains-always change.

The cardigan started out life as a rather insipid gray color and I wore it mainly because the style was perfect for hot weather/cold office changes while I lived in DC. But somehow it got these strange peach stains (sunlight?) and white under arm circles (sweat) and it was not really a great cardigan. It got relegated to the back of drawers for the 3 times a year I needed something like it. However, when I took a batik class I asked the teacher if I could use the purple vat leftover after class for a more basic fabric dying. I was warned that the sweater would always need to be washed separately and that the fabric might not take the strong batik dyes but I hated the cardigan so much with its gray, peach, and white 'motif' that I dunked it in anyway. It was a good risk because I love its color now (though the gray buttonholes due to the thread being polyester was a little odd surprise).

The shirt is from the odd woodland/countryside fabric I grabbed during a spree in Walthamstow so be sure to watch out for its reappearance in a full blog post. It's a simple box blouse.

Not me made are the green jeans but they are a very odd size: 11 ½. God knows what that means but other than perhaps a little more room in the hips or a shorter inseam (for those horizontal crotch wrinkles) they fit perfectly in a way that I'd never expected from skinny jeans on my figure.

Day 4
The dress was a refashion from two of the photographer's cast off shirts (both are good quality shirts, they just don't fit him anymore). It's a color blocked dress with the blue collar replacing the beige collar and the blue sewn onto the bottom of the beige shirt with full length placket. It may have been the first project with my real sewing machine or it may have been made on the faker. Either way, I've buttoned up the cardigan to hide the worst bust darts in the world. Ok, they're not that bad especially since they're probably my first attempts at brand new bust darts ever but I don't want the sewing world to see them. The skirt rides up a lot so I think it's slightly too long in the torso with tightness right where my legs do motiony things. And the style...it's not really mine. It's quite office-y/preppy and I'm an archaeologist...I suspect this should get chopped in two. I quite enjoy the swoops the skirt is doing (following both bottom hemlines) and think with some shortening/creation of a waistband I'd find it much more wearable. The shirt needs those bust darts sorted out and then perhaps a peplum to make up the length that's needed to make it a stand-alone shirt. What do you think is appropriate for the bottom of a men's button up that ends at natural waist?

The belt is a reprise of May 1st.

The tights are hard to see (like my surprise! red hair) but they have multi-colored polka dots drawn on them. I went around for a week with polka dot legs after making them but thankfully they have not washed out of these tights!

Not me-made are my shoes, the slip you can see peeking out, and cardigans. Those are actually my excavation shoes. Usually my summer shoes are torn apart by August, what with the heat, dust, dirt, and daily wearing through hiking, beach going, excavation, and pavement pounding tourism but these survived the summer and looked okay once they got washed twice. I guess though I paid £5 for them that brand name actually meant they're better quality than my usual £5 shoes? The slip was a clearance rack find with a  sleekish silk chiffon bottom with the finest soft jersey knit top. It's a bit big on me and I shortened the straps but I'm pretty sure that making it myself would've be both more expensive and more hair pulling.

Monday, April 1, 2013

Orange & Black Tommy (Top Hat & Bow-Tie)

Ah, first a description of what a Rapper Tommy is. Also called a character, they are a sharply dressed person who is meant to engage the crowd with the dancing. They sing a calling on song meant to grab the audience's attention and generally make jokes all throughout the dance. Our Tommy is also a musician so he got a sash but Tommys do need to look sharper than everyone else. We combed the charity shops of Sheffield and found a dinner jacket that fits him (well, sort of, it's just slightly too big in the shoulders but I seem to be the only one who notices). So with that main base, it was up to me to make the bright orange accessories. He got a pocket triangle (actually a failed sash end!), a bow tie, and a top hat.

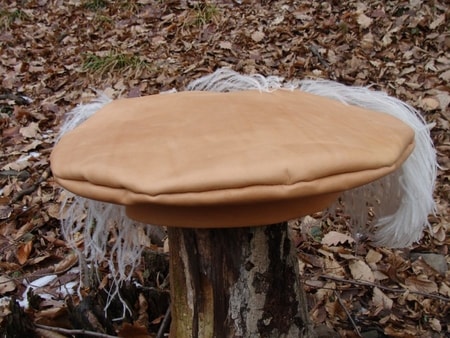
I've sewn up a variety of fabric hats mainly of the Scrooge night cap variety. I have been meaning however to take my hat making repertoire up a notch and begin with a flat cap so I had buckram in my stash. Now I had expected it to become a Renaissancey flat cap for M's Balkan Bandit stage costumes and I figured that'd also be a step up in difficulty so I was looking forward to it. However, it came to be a few days before our competition and we still hadn't been able to buy a top hat for under £absurd. So...I made a top hat. Why not?

Well, 3 curved hand needles (one of them was a book binding needle!), a burn, and 3 shattered machine needles later I really questioned my sanity/ability-to-evaluate-my-own-skills. It was certainly a learning experience! I didn't have millinery gauge wire for the brim rim so I doubled up jewelery wire and shattered my machine needles. I didn't have any mull so I used dressmaker's felt creating a thick and stiff body that was so thick my needles bent rather than make it through though thankfully it stays very upright! Ironing the buckram together really didn't work despite the internet telling me it should have and when the steam made my buckram soft I panicked and burned myself off the buckram. And let me tell you I am thrilled I needed to trim it with bright orange ribbon because the glue stains from my failed top to brim technique are hideous. I hated the crown to side attachment so much I sewed a strip of bias binding to hide the top. Oh, and despite my trying to follow the standard ratio of top hat to face height it's like 3 inches taller than any other hat! This is a special hat.

Which looks spectacular from afar!

the trailing ribbon breaks up the expanse of black from the back

I have to keep reminding myself that this was my very first hat, that I drafted the pattern myself, pretty much guessed at the construction after a half hour on the internet, and that while I look at it and see construction/technique failures, everyone else is just like "What a tall top hat on that dashing fellow!" It really just demonstrates that we are our worst critics. Though I cringed every time M handed it to an admirer.

That bow tie is embarrassingly easy in non-fraying fabric. Ready? Sew a rectangle, turn it seams in, and whipstitch closed. Pinch it in the middle  more or less evenly and sew it ruched. Wrap a thin strip around the middle and sew tight on the back. Sew to an elastic that is slightly looser than the neck. Boom-bow tie. (yeah, this Kitmistress was not going to tie a bow tie before every round)

Monday, March 25, 2013

Orange and Black Musicians (Sashes & Embroidery)

Our rapper musicians, being men, could not be expected to wear the same skirts as the dancers, so their kit went back to the rapper basics of sashes.

I ran into difficulties however in making the sashes. To make our musicians match the dancers the proper thing would be to make the sashes out of the knit fabric which would be fine but sashes need to lie flat at the hanging ends.
My first attempts ranged from sad to outright pathetic.
a few of the "successes"
Finally I had to give it up-this knit fabric was too stretchy that despite dunking it in starch, there was no way to stop it from rolling before bunching out awkwardly at the ends. New fabric had to be found.

Now, I'm not sure you've ever tried to find orange fabric in Yorkshire. The only real choices all tend to be either too red or too seem destined for health and safety high vis wear. In the end the high vis option won mainly because I found this delightful mystery fabric in the Hillsborough fabric shop's clearance section. It's a tough fabric that is actually almost self-interfaced so it holds basically any shape you sew it into.

£1.99 a metre? that's 80p a sash!
So despite it being its own light source (while it was laid out in my sewing room I kept thinking I had left the lights on overnight...instead it was just the fabric reflecting the overcast light), this was going to become our sashes. With no need for interfacing, buckram, weights, cardboard, etc, it was a simple process to sew 2 rectangles together, starch and lightly iron (it melts at higher temperatures) it flat, and whipstitch the ends closed. Easiest sewing project ever? Yep. Does the kitmistress need to keep ironing the tying wrinkles out? Sadly, yes.

Of course I didn't leave well enough alone and decided I'd embroider a monogram on them. A simple typographical design that would be able to be easily but stylishly rendered with stitches. Which lead to me running out of black embroidery thread and discovering that Sheffield shops do not stock black embroidery thread. o.O    So 2 of the sashes are embroidered edges and only the Tommy's sash is filled in. Anyway! Used backstitch to outline the SSR.

oh right, and those are the trophies we won.

Sunday, March 17, 2013

Orange & Black Dancers (Design & Skirts)

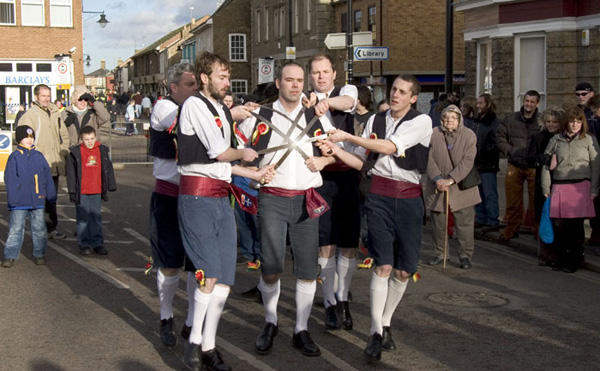
So I dance rapper dance-it's a Northern English traditional dance involving stepping, swords, and teamwork-see Sheffield Steel Rapper dance here. As we're a new team, we needed to think about our costume. I got elected kitmistress and set out to outfit 6 dancers, 2 musicians, and 1 musician/tommy.

That's right, those skirts you see moving there? I sewed them.

Traditionally rapper dance costumes are shorts, knee socks, and sashes but we wanted skirts because, well, we're an all-women's team so why not. With practicality in mind, I knew skirts would be of knit fabric so I sketched out a few croquis ideas. A simple circle skirt base (#1), a wildcard with asymmetry and attached sash (#2), and one with a panel mimicking a sash (#3)


And the first one won. It's a triple circle skirt in reality: full circle overskirt, orange half circle skirt layer with a 1/4 circle lining to prevent riding up and sticking to tights. Each layer is a different length to allow for peeks of color. The waistband allowed for the pop of color and the whole thing is one piece. It's super easy to pull this skirt on and off and the knit allows for weight changes without any worry. The all cotton jersey I sourced makes the whole thing machine washable and it doesn't crease even when shoved into a tiny bag. All in all, extremely portable and versatile. I hoped, as kitmistress, that once I sewed them up, I'd basically not have to worry about them ever again.

And indeed, that has borne out!  
looking good after lunch-we're standing basically still-only peeks of orange at the bottom
still looking good after a day of wear!-depending on movement more or less orange showing

So construction details?
The lining is cut out, the one seam sewed with a small tag with dancer's initials and hemmed via narrow hemming foot.The orange layer is cut out, one seam sewed shut and hemmed via narrow hemming foot. The black layer is cut out in one piece and hemmed via narrow hemming foot. These three layers are zig zagged together. Waistband elastic is sew into a circle. Orange fabric cut in two rectangles that are joined. The orange is wrapped around waistband elastic stitched as closely as possible via zipper foot. This is attached to the skirt itself via some more close stitching via the zipper foot. So the insides are nothing pretty but I left them intentionally raw so that modifications are nice and easy.

in action the orange is very striking!
I am proud that despite sewing 6 in a single week and the very centrifugal forces that act upon our skirts during our spin there is not a popped seam to be found!

Wednesday, July 4, 2012

Button Up Refashion

Don't mind the contrapposto...or the pink
My boyfriend recently culled his button up shirt collection. I was right next to him helping the process by going, "really?! that one?" but he was far more ruthless than I could ever be. This shirt was the first of the pile to get the refashioning treatment since I love menswear tailoring and pin tucks/ruffled pleats more than it's probably healthy.
Since L men's is rather boxy, huge, and unflattering for me I started out by tearing out the side seams and removing the sleeves (aprox. 7 inches too long for me). I let out the sleeve seam allowances to provide a bit of a cap but sewed up the sides into a more curvy silhouette. I removed the collar but sewed up the collar stand because that provided just enough of a collar to make it girly/blousy but still mensweary. I added some bust darts to take up the strange amount of fabric above the *ahem* curvy bits and added some more buttons (and buttonholes) to hide the aforementioned curvy bits. The sleeve caps got bias bound to finish them off and the bottom got cut and sewn into a new curved hem. Ta-dah! A sleeveless blouse that's long enough to cover the posterior with some fantastic pleats! (and no, it'll probably be never ironed again)